Technically tar stands for tape archive, which reflects its original usage for creating tape backups on big iron computers. Many people refer to them as tarballs, so if someone tells you that a file is packed up as a tarball then this is the type of archive they’re talking about.
Method 1: How to Untar a File from the Command Line
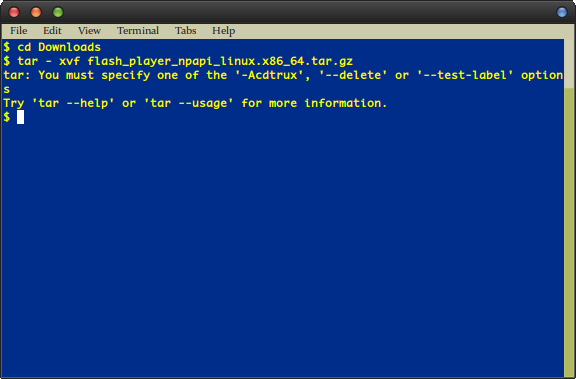
You’ll need to first open up a command prompt using whichever procedure is most comfortable for you. Linux users can search for terminal from the Dash, click on Applications and then select System Tools or hold down Ctrl, Alt and T to start up a terminal window. You could also hold down Ctrl, Alt and a key from F1 to F6 to reach a virtual terminal, which will work as well. These commands should work from the terminal window in almost all other modern Unix systems as well. Assuming you have a tarball archive in your current directory, simply type tar -xvf tarball.tar.gz to extract it. You’ll need to know the name of it. For the sake of illustration, we downloaded a tarball of Adobe Flash Player for Linux. Start by typing cd ~/Downloads to get to your downloads directory and then type tar -xvf flash_player_npapi_linux.x86_64.tar.gz to extract this file. That sounds like a ton of typing, but all you actually have to do is type tar -xvf fl and then start pushing the tab key. The command prompt will fill in the rest for you. When you attempt to untar an archive, you might end up with an error message that reads something like: tar: You must specify one of the ‘-Acdtrux’, ‘–delete’ or ‘–test-label’ options Try ‘tar –help’ or ‘tar –usage’ for more information.
More than likely, you put a space between the – symbol and the xvf options on the command line. This makes it so that the tar program doesn’t know what options you’re using since it ends up thinking that xvf is part of the file name. You’ll need to either type tar -xvf flash_player_npapi_linux.x86_64.tar.gz or totally leave out the – and type tar xvf flash_player_npapi_linux.x86_64.tar.gz then push enter. You don’t actually need the – and can comfortably leave it off.
If you see a file that ends with .tar.bz2 or .tar.xz, then just follow the same procedure. You might even find ones that are shortened like .tgz or .txz, and you can use the same procedure to extract them too. The tar program will know the exact way to decompress them in most cases as long as you make sure to use tar -xvf or tar xvf first. The x tells it to extract the files from it, v tells it to be verbose and tell you what it’s doing and finally, the f tells it to point to the specific file you named.
Method 2: How to Graphically Untar an Archive
The command line is easier to use than a graphical file browser in most cases, but you can actually use Nautilus, Thunar or any of the other major file browsers integrated into your desktop environment if you’d like. It’s easy to untar files this way if you’ve just downloaded them and need to look right away. Open your file browser by holding down the Super key and pushing either E in LXDE or F in Xfce4. You can start it from the Dash in Unity or the KDE menu in Kubuntu or any of the other major KDE-based distributions. Once you have it running, navigate to where your tar archive is. Right click on the archive or highlight it with the cursor keys and push the Menu key. Select “Extract Here” and your desktop environment will automatically untar the archive right in the current directory.
Selecting “Extract To..” will instead open up a new dialog box that will allow you to select a location for where to put the files. This is a good idea if you already have other files or subdirectories inside of the directory that you’re in, which can make you lose whatever you’re extracting when you untar the archive!
Windows 10 Now Has Arch Linux Along With Ubuntu, SUSE And Other Complete Linux…Linux Mint 20 “Ulyana” An All 64-Bit Linux OS Based On Ubuntu 20.04 Stable…How to View the Contents of a Text File from the Linux Command LineHow to Unregister Wine File Associations in Linux


